
5 Tips for Hanging a Gallery Wall
/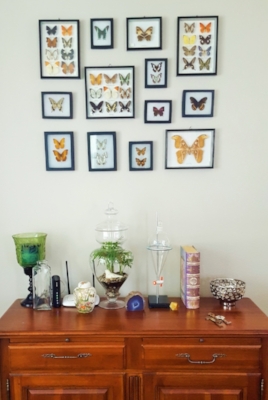
Beautiful real butterfly specimens!
1. Test Your Layout
After you collect the art pieces that you want to use to make your gallery wall, set them out on the floor to test arrangements and determine how much space you want to have between the items. If you are having trouble visualizing the arrangement on the wall, pieces of paper can also be cut out for the shape of each piece of art and can be taped to the wall. Consider the colors and shapes of your items - balance the different colors and spread out the various sizes and shapes so the design does not look to visually heavy in any one area.
2. Measure Your Arrangement
Review your the layout of your art objects and pay attention to the spaces between them. Are they uniform? Are they correct and proportional? When you are satisfied on the finalized arrangement, measure its width at the widest point and its height at the tallest point. Do not pick up the arrangement from its layout, as it is easiest to use it as reference as you hang the pieces.
3. Draw Your Frame
Mark out a center point for your arrangement and mark it with pencil on the wall. Divide your width and height measurements from Step 2 in half, and measure those distances out from the center point. Mark the boundaries of your galley with a pencil. Drawing out the frame helps to keep the arrangement centered while the items are hung.
4. Choose a Starting Point
If you have a rectangular or square arrangement, it is easiest to begin by placing the corner pieces so that you stay within your marked boundary lines. From there place items that have a side that will be set along the boundary lines of your drawn frame. Finish with the center pieces that are not along any boundary line.
For arrangements with irregular boarders or rounded borders, such as oval or circular arrangements, it is often helpful to choose a key focal point item and place that one first. This key piece may or may not be the physically largest in your arrangement, but is the most eye-catching. If you have a key focal point object, or objects, place those first to be sure that they fit perfectly in the boarders you have outlined.
5. Use a Level and Plenty of Light
Check that your art items are hanging level frequently throughout the process. You can correct any tilt to make the items parallel to the wall by adding poster tack or a removable mounting square on the rear of the art. This will also help to fix the art to its spot on the wall and keep the arrangement looking sharp. Use all the light available to you in the room, but be cautious of bringing in too much light from sources not usually present in the room as they may alter the perception of color and cast unusual shadows. Keep in mind that for art with some 3D elements, the shadows themselves may make as much statement as the art itself.
